Are you experiencing issues with your PS5 controller? Perhaps the buttons are sticking, or the joystick isn’t responding as it should. Whatever the problem, knowing how to take apart your PS5 controller can be a handy skill. This guide will walk you through the process, step by step, making it easier to fix minor issues without needing to search for “PS5 controller repair near me.” Understanding the inner workings of your controller not only empowers you to perform DIY repairs but also saves you time and money in the long run.
Having a basic understanding of your PS5 controller can help you troubleshoot a variety of common problems. Whether you’re a casual gamer or someone who spends hours in front of the console, the wear and tear on your controller can lead to frequent issues. By familiarizing yourself with the disassembly process, you become more adept at maintaining your equipment. Plus, the satisfaction of resolving these issues on your own is immensely rewarding. With that said, let’s dive into the tools you’ll need and the steps to take your PS5 controller apart.
Tools You Will Need
Before you start, gather the necessary tools. Having everything on hand will make the process smoother and ensure you don’t damage your controller. It’s important to use the correct tools to avoid causing harm to the delicate parts inside your controller. Not only will this help preserve the integrity of the components, but it will also make the disassembly and reassembly process much more efficient.
Essential Tools
- Precision Screwdriver Set: A small Phillips head screwdriver is essential. This tool is specifically designed for handling the tiny screws that keep your controller intact. Make sure you have a set with various sizes, as this will come in handy for different parts of the disassembly process.
- Plastic Pry Tools: These help open the casing without scratching it. Using metal tools can damage the plastic exterior, so plastic pry tools are a must to keep your controller looking pristine.
- Tweezers: Useful for handling small components. Tweezers allow for precision when disconnecting or reconnecting tiny cables and components, preventing unnecessary damage.
- Soft Cloth: To keep your work area clean and protect the controller’s surfaces. A soft cloth will ensure that you have a tidy workspace and that the controller remains free of dust and debris during the repair process.
Step-by-Step Guide to Disassemble the PS5 Controller
Step 1: Remove the Back Cover
- Power Off: Ensure your controller is turned off before you start. This step is crucial to prevent any electrical damage or personal injury while handling the device.
- Remove Screws: Use the precision screwdriver to remove the screws located at the back of the controller. Keep these screws in a safe place, as you’ll need them for reassembly.
- Pry Open the Back Cover: Gently use a plastic pry tool to separate the back cover from the rest of the controller. Start from one edge and carefully work your way around. Take your time with this step to avoid snapping the plastic clips that secure the cover.
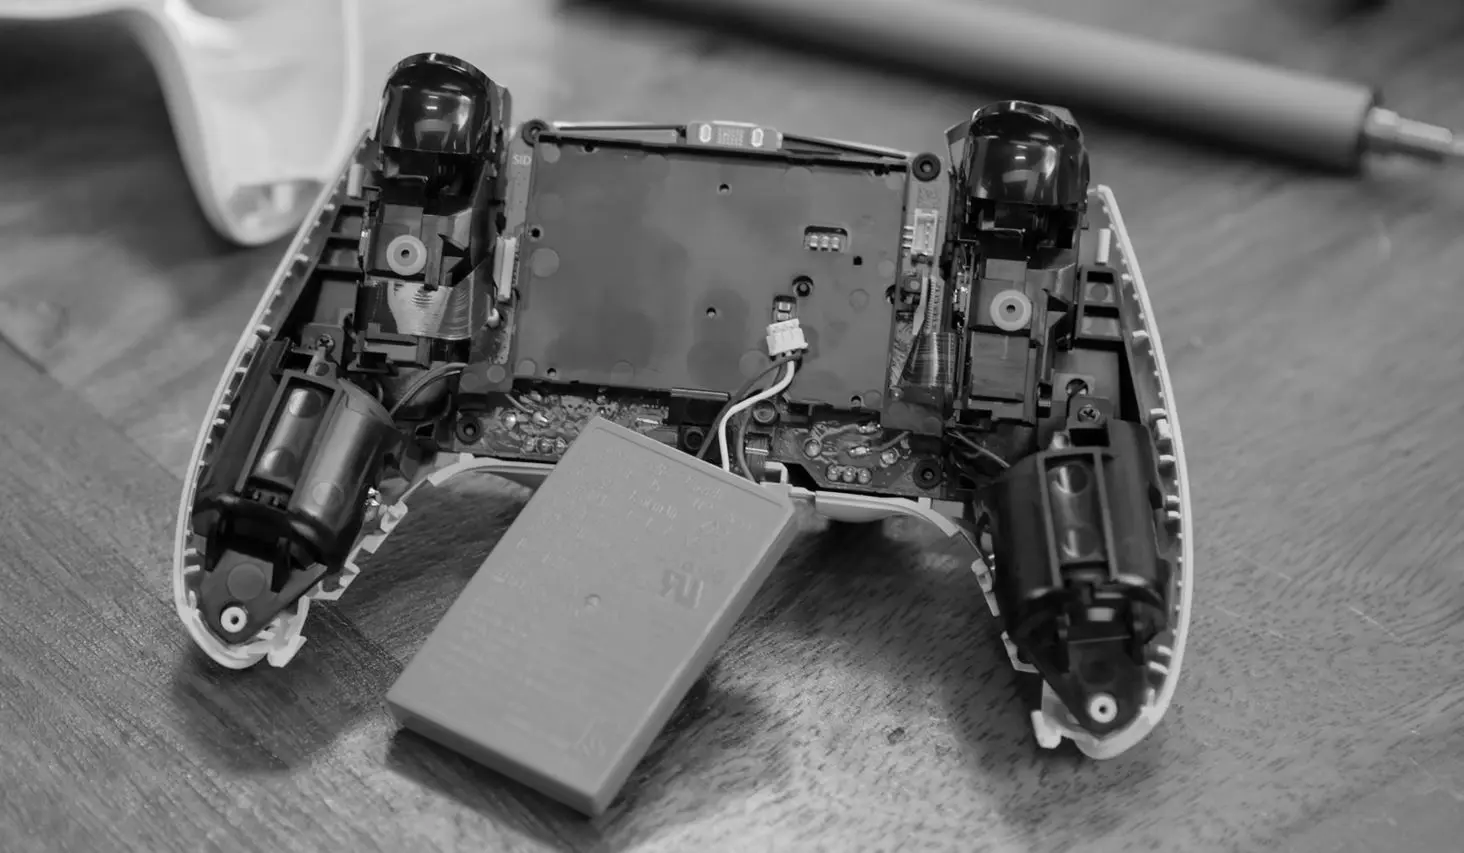
Step 2: Detach the Battery
- Locate the Battery: Once the back cover is off, the battery will be visible. The battery is typically a small rectangular component that powers the controller.
- Disconnect the Battery Connector: Use tweezers to gently detach the battery connector from the mainboard. Ensure you do this gently to avoid damaging the connector pins.
- Remove the Battery: Lift the battery out carefully. Be cautious not to pull on any wires or connectors as you remove the battery, as this can lead to damage.
Step 3: Access the Internal Components
- Remove Additional Screws: There are more screws holding the internal components. Remove these to access the circuit board and other parts. Make sure to keep these screws organized to avoid confusion during reassembly.
- Disconnect Ribbon Cables: Gently detach any ribbon cables connected to the circuit board. Use tweezers to avoid damage. These cables are delicate, and forceful handling can lead to costly repairs.
Step 4: Separate the Circuit Board
- Lift the Circuit Board: Carefully lift the circuit board out of the controller casing. Take note of how the board is positioned, as you’ll need to replace it the same way.
- Inspect for Issues: Check for any visible damage or loose connections that might be causing the issues. Look for signs of wear or corrosion, which can affect the controller’s performance.
Common PS5 Controller Issues and Solutions
Sticky Buttons
Solution: Clean the button areas with isopropyl alcohol and a cotton swab. Ensure no residue is left behind, which can cause sticking. Regular maintenance can prevent this issue from recurring, so consider cleaning your controller regularly.

Unresponsive Joystick
Solution: Check if the joystick module is loose or damaged. If it’s loose, secure it back in place. If damaged, consider replacing it with a new module, available in most PS5 controller repair kits. Testing the joystick’s functionality before reassembly can save time and effort.
Drifting Joystick
Solution: This often requires a module replacement. Follow the disassembly steps to access the joystick module and replace it. Once replaced, recalibrate the joystick using your console’s settings to ensure optimal performance.
Reassembling the PS5 Controller
Once you’ve addressed the issues, it’s time to put your PS5 controller back together. Reassembly is essentially reversing the disassembly steps, but it requires just as much attention to detail to ensure everything fits together properly.
Step 1: Reattach the Circuit Board
- Place the Circuit Board: Gently place the circuit board back into the casing. Make sure it sits securely and aligns with the screw holes.
- Reconnect Ribbon Cables: Carefully reattach all ribbon cables to their respective connectors. Double-check each connection to ensure they are secure.
Step 2: Replace the Battery
- Insert the Battery: Place the battery back into its slot. Ensure it’s positioned correctly so that the connector aligns with the socket on the mainboard.
- Reconnect the Battery Connector: Use tweezers to reconnect the battery to the mainboard. Make sure the connection is firm to avoid power issues.
Step 3: Secure the Back Cover
- Align the Back Cover: Align the back cover with the rest of the controller. Press it down gently to ensure all clips snap into place.
- Screw the Cover Back On: Use the screwdriver to secure the back cover with the screws you previously removed. Tighten them just enough to hold the cover securely without stripping the threads.
When to Seek Professional Help
If you encounter serious issues or feel uncomfortable taking apart your controller, it might be best to seek professional help. Companies like uBreakiFix offer services for PS5 controller repair and can provide an estimate for repair costs. Searching for “PS5 controller repair cost” online can help you find a service that fits your budget. Professional services can handle complex repairs that require specialized skills and equipment.
While DIY repairs can be cost-effective, they aren’t always the best solution, especially for intricate issues like internal circuit failures. A professional repair service can offer warranties and guarantees on their work, providing peace of mind that your controller is in expert hands. Don’t hesitate to reach out to a professional if you feel the repair is beyond your comfort level.
Conclusion
Taking apart your PS5 controller might seem daunting at first, but with careful handling and the right tools, you can address many common issues yourself. Whether it’s fixing a sticky button or replacing a drifting joystick, this guide has you covered. Remember to always handle components gently to avoid further damage. By taking the time to understand your controller, you enhance your gaming experience and prolong the device’s lifespan.
By following these steps, you can extend the life of your controller and enhance your gaming experience without the immediate need for professional repair services. If you still face challenges, don’t hesitate to seek expert advice to keep your gaming uninterrupted. Armed with the knowledge from this guide, you’re better equipped to maintain your controller and keep it in top gaming condition.